tutorial // creating spline blueprint
|
Alright so to get started you of course will want to have opened your unreal
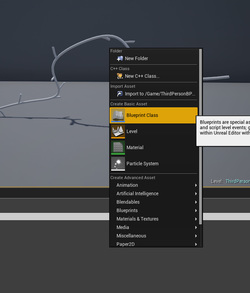
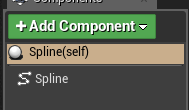
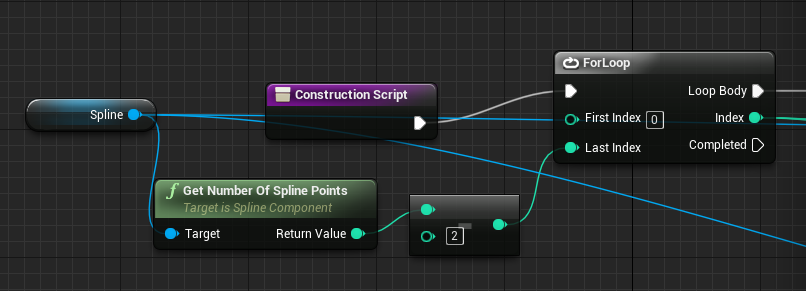
file and have the mesh that you want to use for your spline imported into unreal. Step 1: Right click in the content browser and create a new Blueprint Class, name it what you want, in my case I named it simply "Spline". Once you've done that, go a head and open it. Step 2: In the top left corner of the spline browser, under components, click add component and type in spline. You want the spline Utility not Mesh. Once it's made then drag it over the parent actor to replace what was there, therefore it will just be the splined line and there will be no specific mesh that HAS to be used. Step 3: Go into the Construction Script and drag in the Spline. Next you'll need to add a Get Number of Spline Points function and then plug that into a subtract (-) integer. You will also need a ForLoop flow control. |
|
Step 4: Now that you have those 4, you will be connecting them together. First connect your Spline into the Get number of Spline points in the target slot. Next connect the return value of the spline points into the subtract integer before connecting that into Last Index of the ForLoop. Now with that, connect the Construction Script into the Exec of the ForLoop as well. It should look a little something like this:
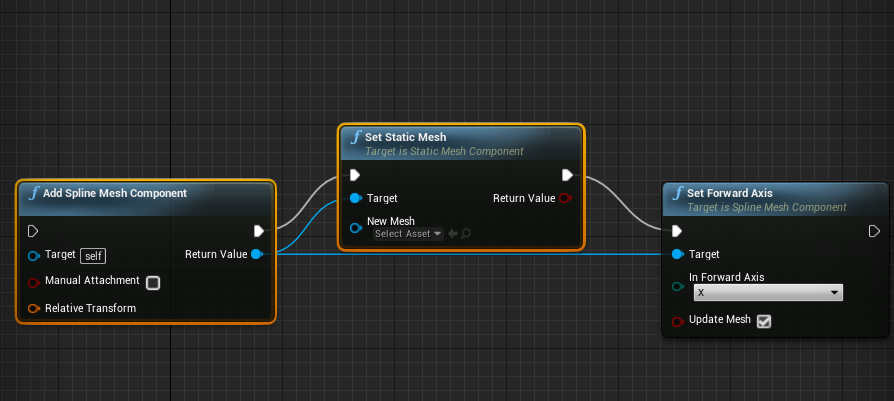
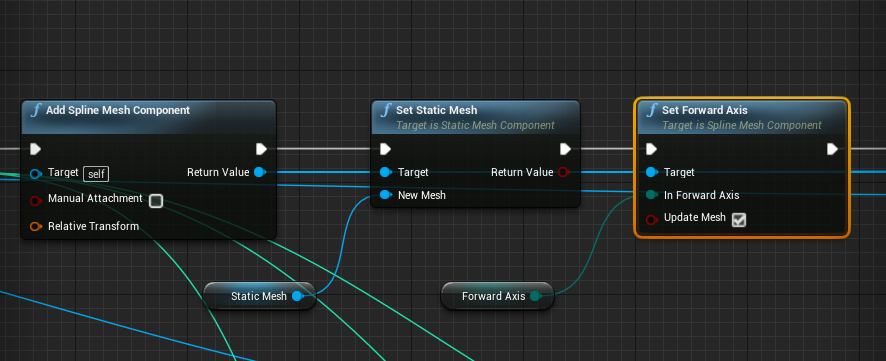
Step 5: Alright so the next 5 pieces we need is an Add Spline Mesh Component, Set Static Mesh, and Set Forward Axis. These are the main three that we will need. The Added Spline Mesh Component will be plugged in from the ForLoop Loop Body, which is the white wire. Once that is connected then you'll also connect the white wire FROM the Add Spline Mesh TO the Set Static Mesh. You will also connect the Return Value from the Add Spline Mesh to the Target on the Set Static Mesh. Next Might get a little tricky. You are going to connect the white wire from Set Static Mesh to the Set Forward Axis however you still connect the Target of the Set Forward Axis from the Add Spline Mesh Return Value.
Once you have those connected. Then drag out from New Mesh of Set Static Mesh and from In Forward Axis of Set Forward Axis. You will then create two new variables. Once will be renamed to Static Mesh which will allow you to choose the mesh you want to spline, and rename the other which will be a boolean Forward Axis which will allow you to change the direction the mesh will spline from.
Once you have those connected. Then drag out from New Mesh of Set Static Mesh and from In Forward Axis of Set Forward Axis. You will then create two new variables. Once will be renamed to Static Mesh which will allow you to choose the mesh you want to spline, and rename the other which will be a boolean Forward Axis which will allow you to change the direction the mesh will spline from.
|
|
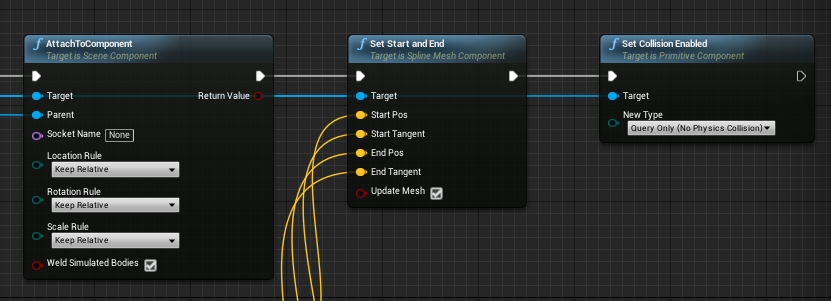
Step 6: Next you need to get AttachToComponent and you would attach the Exec from the Set Forward Axis to it, and attach the Return Value of Add Spline Mesh into the Target. Next you will connect the Spline you made in step 3 into the Parent section of the AttachToComponent. Next you need a Set Start and End which will be connected from AttachToComponent white wire and the Target once again is connected from Add Spline Mesh. The very end of the white wire line you will need to add Set Collision Enabled. The white wire is connected from Set Start and End and the target is connected to the yup, you guessed it, the Add Spline Mesh. Once you get those together it should look like this:
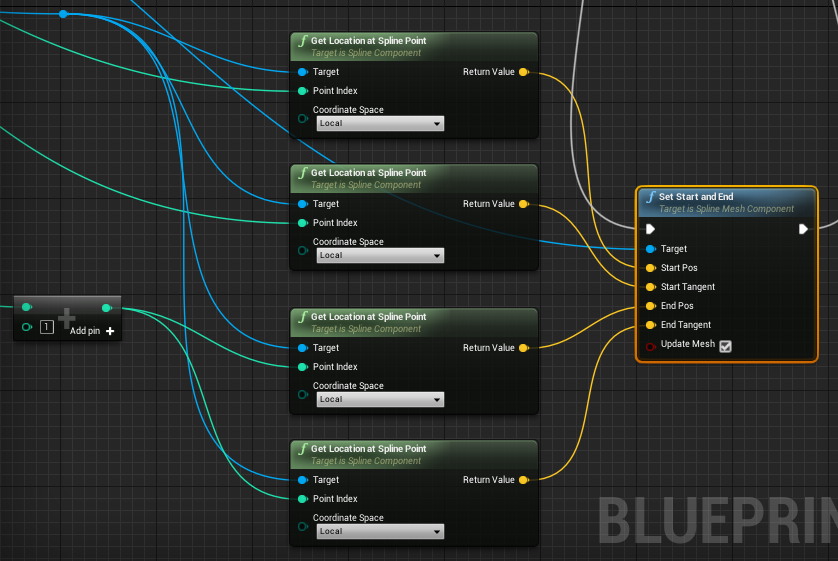
Step 7: Now for the tricky part. This part took me some time to figure out so I'll do my best to explain not just how but why things are put together this way. So, from the picture above, the Set Start and Finish has a bunch of yellow lines coming from it. So below them you are going to need FOUR Get Location at Spline Point's. I put them underneath each other neatly and plugged them into Set Start and End in order from top to bottom. Now for the bottom two Get Location at Spline Point we are going to create a plus (+) integer like we did before and plug it into the bottom two Point Index.
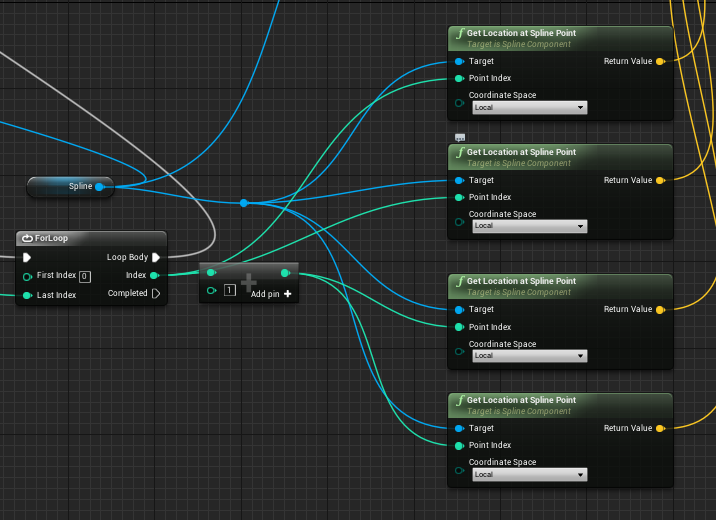
Step 8: Your final step now is to connect the index from the ForLoop and connect it into the point index of the top two Get Location at Spline Points, and plug it into the plus (+) integer that is connected into the bottom two Get Location at Spline Points. Last step that needs to make sure to be done is connecting your Spline to all the Targets in the Get Location at Spline Point. Looking like this:
Once you have this done all that is left now is to compile it and make sure it works. Save your Blueprint and all thats left to do is drag it out into your scene, grab a mesh that you wish to spline and place it into the Static Mesh spot on the side under Default, as well as selecting the axis your mesh is facing and it should work!

